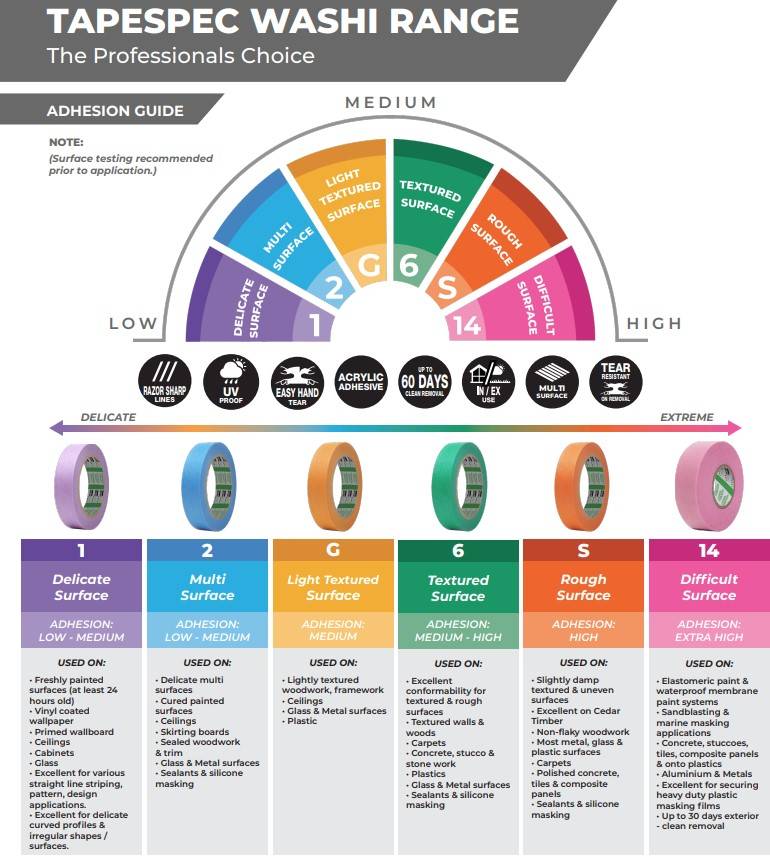
Many elements are out of the distributor and manufacturers control when applying tapes.
Some of these elements are;
- The surface condition and substrate integrity at the time of application and removal.
- Environmental conditions on application and removal (especially temperature and UV exposure).
- The age and condition of the tape, such as where the tape has been stored or any cuts, knicks and damages to the edge of the roll.
- Has the tape been previously tested to assess whether it is the correct tape for the application?
- Have all preparation and application instructions been followed?
- It is recommended not to expose rubber based adhesive tapes to harsh chemicals and solvents.
- All sales of tapes have limited liability to replacement of tape, if proven to be faulty under the manufacturers limited warranty.
SURFACE CLEANING
” Aim for the best clean surface for the best result”
- Ensure all surfaces to be masked are free from DUST, MOISTURE, OILS, GREASE, OXIDATION, RELEASE AGENTS and all other contaminants.
- If using a surface cleaner ensure that it is non-greasy and always use a clean cloth with no loose fibres or cloth particles.
- Ensure that all surfaces are non-flaky or damaged in any way that may cause tape application and removal issues.
TYPICAL APPLICATION
- Select the correct tape to suit the application and conditions (interior or exterior use)
- On application, do not stretch the tape.
- Apply a firm hand pressure whilst applying the tape to the surface. This will help with better adhesion to ensure clean paint edges with no paint bleed.
- Tools can be used to assist tape application like plastic applicators and painters knives.
- Application onto light moist surfaces can be difficult. Ensure the correct masking tape is selected and test to confirm suitability.
- If the masking tape is applied for extended time periods, it is recommended to regularly check small sections to assess any adhesive transfer issues, especially if the tape is exposed to UV sunlight for length time periods.
TAPE REMOVAL
TAPE REMOVAL WAITING TIMES
- Once you have finished painting, allow the paint surface to dry before removing the tape.
- How long you wait will depend upon the drying time of the paint product – it must be touch dry.
- If painting more than one coat, it is advised to wait until the last coat has had time to dry.
RECOMMENDED TEMPERATURE
- Remove tape at air temperature of between 15-40C
- Higher temperatures will increase the chance of adhesive transfer and colder temperatures increases the chance of tape tearing.
REMOVE AT AN ANGLE
- It is recommended to remove the tape back on itself at a 45 degree angle this will assist with any residue and help ensure a cleaner edge.
- If any adhesive is removing, try a 90 degree angle.
SLOW and STEADY REMOVAL
- Adhesive tapes must be pulled off slowly, steadily and never in jerks. Slow removal will reduce the chance of adhesive residue issues and tape tearing.
- A heavy coat of paint on the tape could cause the tape to tear so try not to get too much paint on the tape.
- If the adhesive is facing direct sunlight, it may cause some adhesive residue. Make sure you select an acrylic adhesive based tape if it is exposed to direct sunlight.
- It is very important to remove the masking tape when the paint is dry, not wet.
TAPE STORAGE
- Store the tapes in a dry environment, ideally at room temperature but below 20 degrees.
- Avoid high humidity and direct sunlight.
- Make sure you store the tape in a clean place as any dirt or duct stuck to the edges of the tape may affect its performance.
- 12 month shelf life
ADHESIVE REMOVAL
- If adhesive residue is left behind you can try removing it with a bit of soap and warm water.
- A hairdryer can be used to loosen the residue.
- You can use a high tack masking tape to try and pick up any residue left behind.
- Make sure you use a clean cloth.
- You can use citrus based cleaners (but make sure you test them first on a small section to ensure they don’t have any adverse effects).


